
Control Your Crowd - Developer Guide
- 1. Setting up
- 2. Design
- 3. Implementation
- 4. Documentation
- 5. Testing
- 6. Dev Ops
- Appendix
1. Setting up
The instructions for setting up can be found here.
2. Design
2.1 Architecture
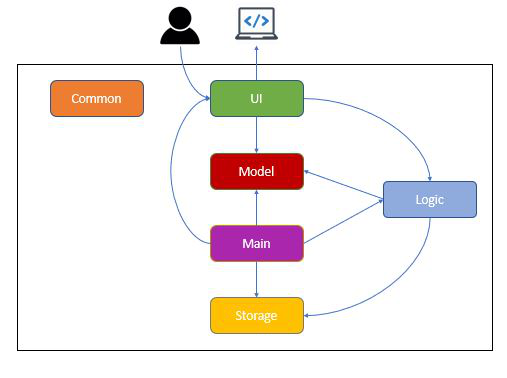
Figure 1. Architecture Diagram
The Architecture Diagram shown above explains the high-level design of Control Your Crowd (CYC) application. Below is a quick overview of each component.
Main is a class that is critical to starting the application proper, as well as exiting it:
-
At app launch: Retrieves memory and saved log files (If available), initializes components in correct sequence, and connects them with each other.
-
At shut down: It saves the log file to storage, and shuts down all components.
Common consists of a class of messages used by multiple components.
Messagesconsists of a list of messages that will be displayed to the users, for various reasons such as error handling and user notification.
The rest of Control-Your-Crowd (CYC) consist of four components.
-
UI: The user interface of the application, and the entry point from the user. -
Logic: The command executor for CYC. -
Model: Holds the in-App data, such as the details of the user, and their checked-in/checked-out status. -
Storage: Reads and writes data from the hard disk to CYC.
How the architecture components interact with each other
The Sequence Diagram below shows how the components interact with each other for the scenario where the user issues
the command clear.

Figure 2. Component interactions for clear command
2.2 UI component

Figure 3. Structure of UI component
API : seedu.duke.ui package
The UI consists of TextUi class. It acts as a middleware between users’ input
and Parser class under Logic Component.
The UI component,
- Reads user commands using
Scannerclass. - Pass raw user commands into
Parserclass under Logic Component. - After the Logic Component has executed the function, it will then return
CommandOutputobject which contains the outcome of the execution, fail or succeed.
2.3 Logic component

Figure 4. Structure of the Logic Component
API : seedu.duke.logic package
The Logic component,
- Uses the
Parserclass to parse the user input obtained by theTextUiclass ofUI. - This results in a specific
Commandobject to be returned from theParserclass. - Depending on the type of the
Commandobject, its corresponding command execution will be called byMainclass. - Some command execution affects the data in
Model(e.g. clearing the list). - The result of the command execution is encapsulated as a
CommandOutputobject which is passed back to theTextUi. - In addition, the
CommandOutputobject can also instruct theTextUito perform certain actions, such as displaying the list to the user.
Given below is the Sequence Diagram for interactions within the Logic component for the parseCommand("clear)" API call.

Figure 5. Interactions Inside the Logic Component for the clear Command
2.4 Model component
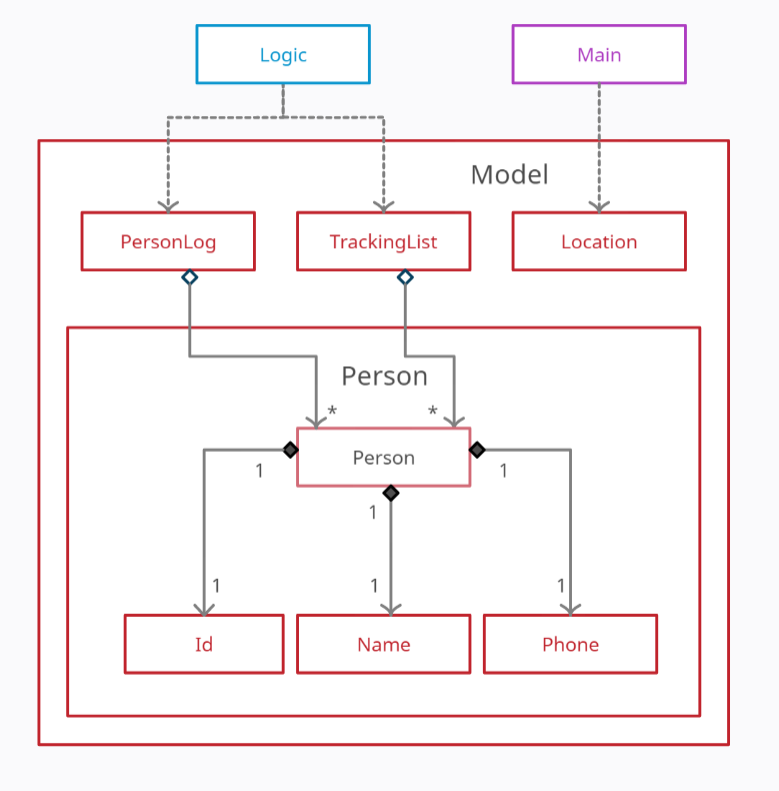
Figure 6. Structure of the Model Component
API : seedu.duke.model package
The Model component,
- contains a
Personclass which represents a person who checks in/out. - contains a
TrackingListclass which uses an ArrayList to keep track of all thePersonobjects who have currently checked in/out. - contains a
PersonLogclass which uses a HashMap to permanently store all thePersonobjects who have checked in before.
A Person object contains:
- an
Idobject - a
Nameobject - a
Phoneobject
2.5 Storage component

Figure 7. Structure of the Storage Component
API : seedu.duke.storage package
The Storage component,
- saves and encodes
Personobjects inTracking Listinto a.txtfile. - reads a
.txtfile of valid encoding and populates aTrackingList - records a log of all historical states of
TrackingList - keeps a list of user setting in a
Config.propertiesfile which is read on launch - defaults to
TrackingList.txtbut can be saved at a custom specified location - loads on program startup automatically saves after each command
The storage module uses the StorageFile class to store the TrackingList class from Model.
StorageFile achieves this by using two helper classes, TrackingListEncoder and TrackingListDecoder.
StorageFile is called by the main class after the execution of any Command.
TrackingListEncoder takes the currently stored TrackingList and converts it to a more storage friendly String.
This String is then written to a file on the disk, known on the diagram as StoredTrackingList.
As the name suggests, TrackingListDecoder achieves the reverse by taking the file on drive, StoredTrackingList,
and interprets the file to be loaded into the memory as a TrackingList.

Figure 8. Illustration of Storage Structure
StoredTrackingList is the .txt file stored in the same directory as the program.
The location is determined by the ConfigFile class.
LogFile takes the TrackingList every time the storage is updated
and packages it into json formatted string.
LogFile communicates with the disk by calling the methods
loadLogFile and saveLogFile in the StorageFile class.
History stores a record every time the Command CheckIn and CheckOut are successfully executed.
It includes information about the Person details, Time the person checked in, and movement
(whether the person was checked in or checked out)
The data is stored in a csv format in History.txt.
The program settings for the user is manged by the ConfigFile class.
Another file, settingsFile is read by ConfigFile when the program is started,
to load the settings into the program memory.
When a change is made by the user, ConfigFile will update the settingsFile through a save function.
2.6 Common classes
Classes used by multiple components are in the seedu.duke.commons package.
3. Implementation
This section describes some significant details on how certain features are implemented.
3.1 Visitor Log feature
The visitor log feature is implemented using two classes, PersonLog class and LogFile class. PersonLog provides
a runtime storage while LogFile provides a long term storage. Only the PersonLog class provides the API for
the Visitor Log feature. So, other classes should only access the PersonLog’s methods.
3.1.1 PersonLog
PersonLog uses a Java HashMap to store the details of a Person object. It uses a visitor’s identification number,
Id object, as a key to the HashMap.
Additionally, it implements the following operations:
addPerson(Person object)- Adds aPersonobject into the HashMap.findPerson(Id obect)- Returns aPersonobject if found.saveAllPersons()- Saves all the visitor’s information into theLogFile.loadAllPersons()- Load all the visitor’s information from theLogFile.
3.1.2 LogFile
LogFile uses Google’s Gson Java library to convert between a Person object and
its JSON representation. It then uses a StorageFile object to write or load the JSON representation from the disk.
All the visitor details are saved in LogFile.txt.
Additionally, it implements the following operations to be used by PersonLog:
saveAllPersons(ArrayList<Person> object)- Converts all thePersonobjects given into JSON representation and saves them into the disk, using aStorageFileobject.loadAllPersons()- Loads the JSON representation of thePersonobjects in the disk, using aStorageFileobject. It then converts the JSON representation intoPersonobjects.
The following sequence diagram shows how loading all the visitor’s information from storage functionality works:
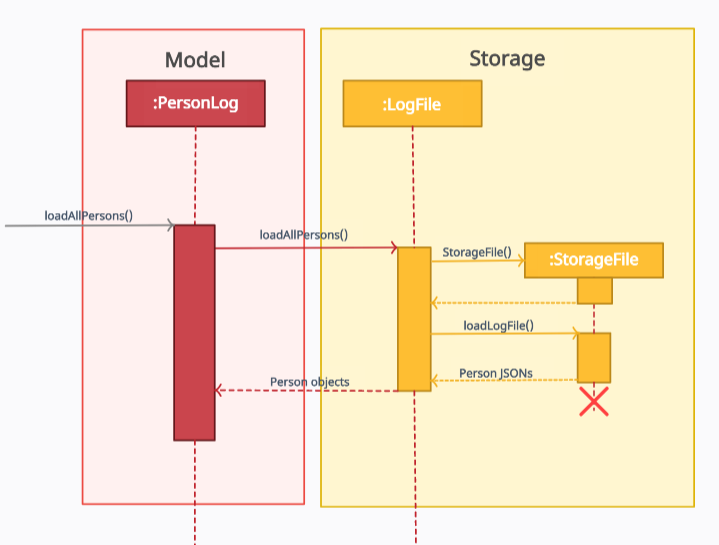
Figure 9. Component interactions for loadAllPersons()
3.1.3 Design Considerations
- Alternative 1 (current choice): Save all the
Personobjects into the disk every time a newPersonis added into the HashMap.- Pros: Easy to implement.
- Cons: May have performance issues as it is inefficient to rewrite the entire file every time a new
Personobject is added.
- Alternative 2: Save only the new
Personobject added into the HashMap, using append mode when writing into the file.- Pros: Efficient performance
- Cons: Before writing a new
Peronobject into the file, need to check if the previous records in the file were not tampered with.
4. Documentation
Refer to the Documentation Guide here.
5. Testing
Using IntelliJ JUnit test runner
- To run all tests, right-click on the
src/test/javafolder and chooseRun 'All Tests' - To run a subset of tests, you can right click on a test package, test class, or a test, and
choose
Run 'ABC'.
6. Dev Ops
Build Automation
Crowd Your Control uses Gradle for build automation and dependency management.
Given below are how to use Gradle for some important project tasks.
-
shadowJar: Uses the ShadowJar plugin to creat a fat JAR file in thebuild/libfolder, if the current file is outdated.
e.g../gradlew shadowJar. -
run: Builds and runs the application.
runShadow: Builds the application as a fat JAR, and then runs it. -
checkstyleMain: Runs the code style check for the main code base.
checkstyleTest: Runs the code style check for the test code base. -
test: Runs all tests.<./gradlew test— Runs all tests./gradlew clean test— Cleans the project and runs tests
Continous Integration (CI)
This project uses GitHub Actions for CI. The project comes with the necessary GitHub Actions configurations
files (in the .github/workflows folder). No further setting up required.
- Repository-wide checks
Making a release
Here are the steps to create a new release.
- Update the version number in
Main.java. - Generate a fat JAR file using Gradle (i.e.,
gradlew shadow). - Tag the repo with the version number. e.g.
v0.1 - Create a new release using GitHub. Upload the JAR file you created.
Appendix
Appendix A: Product scope
Target user profile
- User that requires more control over crowd level management in a building.
- Can type fast
- Prefers a simple desktop application over the more complicated systems
- Is reasonably comfortable with CLI apps
- Requires real time monitoring and tracking capability of people in the building
- Wants a cheaper alternative to crowd tracking systems
Value proposition
A fast and versatile software solution that enables mall management to crowd control in the most efficient way possible.
Appendix B: User Stories
Priorities: High (must have) - ***, Medium (nice to have) - **, Low (unlikely to have) - *
| Priority | As a … | I want to … | So that I can … |
|---|---|---|---|
| *** | venue/event staff | be able to review the personal particulars of the customer | be aware of who he is |
| *** | new user | be able to use the program without much training | use the program as soon as possible and easily implement it |
| *** | mall staff | be able to view the current capacity of people in the mall | know when to stop letting people in |
| ** | mall staff | be able to easily key in a unique personal identifier | check in or find a visitor |
| ** | mall staff | be able to easily key in a unique personal identifier | check out a visitor |
| ** | venue/event staff | key in personal particulars easily into the application | check in visitors quickly without holding up a line of customers |
| ** | venue/event staff | be able to easily key in a unique personal identifier | check in and find a visitor |
| ** | visitors | be able to check in and check out within a few seconds | enter and leave the mall faster |
| ** | venue/event management | be able to check who came and left | carry out contact tracing efficiently |
| * | user | be able to move the saved data around | continue using the program on another machine |
| * | user | be able to encrypt visitors’ private details | privacy of the visitors will be not compromised |
Appendix D: Non-Functional Requirements
-
The program works on all major modern operating systems (Windows, macOS, Linux) without any effort by the user, as long as the system has Java 11 or above installed.
-
The program should boot up in less than 15 seconds.
-
A user with above average typing speed for regular English text (not code or system admin commands) should be able to accomplish most of the tasks faster with the use of commands using just the keyboard.
-
Check in and check out for each visitor should take less than 5 seconds.
-
User or staff should be able to find details of visitors (if he has checked in with phone number before) within 10 seconds.
-
User should be able to move the stored data to another machine by following simple instructions from the user guide.
-
The format of data stored in history file should be easy to understand for the users.
-
The error messages on the programme should be cleared enough so that users can troubleshoot himself/herself.
-
The log files, especially those containing sensitive personal data, are stored locally and no wireless transfer is allowed.
-
Maintenance to clear the log files should be smooth and fast with no delay.
Appendix E: Glossary
Refer to Glossary here.
Appendix F: Instructions for manual testing
Given below are instructions to test CYC manually.
- These instructions only provide a starting point for testers to work on; testers are expected to do more exploratory testing.
- You can refer to the User Guide for further information regarding the command formats.
Launching CYC
- Initial launch of CYC
- Download the jar file here and copy into an empty folder.
- Open up a command window to that folder with the jar file.
-
Run the command
java -jar CYC.jar X(where X is a positive number that is less than 7 digits)Expected: CYC will be loaded, and a welcome message will be shown. Ensure that the version number in the welcome matches version of the jar file downloaded.
Check in a visitor
- Check in a visitor for the first time
- Prerequisites: Ensure that the visitor you are trying to check in is not in the
LogFile.txtfile by checking the ID. -
Test case:
checkin i/123A n/John p/12345678(where John with ID 123A is not found in theLogFile.txtfile)Expected: John will be successfully checked in. Details of the current capacity will also be shown.
- Prerequisites: Ensure that the visitor you are trying to check in is not in the
- Check in a registered visitor
- Prerequisites: Ensure that the visitor you are trying to check in is in the
LogFile.txtfile by checking the ID. -
Test case:
checkin i/123B(where a visitor with ID 123B is found in theLogFile.txtfile)Expected: The visitor corresponding to the given ID will be checked in successfully. Details of the current capacity will also be shown.
- Prerequisites: Ensure that the visitor you are trying to check in is in the
- Check in a registered visitor who is already checked in
- Prerequisites: The checked in status of a particular visitor with known ID can be obtained using
find i/123A(where 123A is the ID of the visitor). -
Test case:
checkin i/123A(where the visitor with ID 123A is already checked in)Expected: A message with the visitor corresponding to the given ID has already checked in will be shown.
- Prerequisites: The checked in status of a particular visitor with known ID can be obtained using
- Check in a visitor after the maximum capacity is reached
- Prerequisite: Check if maximum capacity is reached. The number of people left to maximum capacity can be
obtained using
listcheckedincommand, or the current capacity can be obtained whenever a visitor is successfully checked in or out. If needed, check in visitors until maximum capacity is reached. -
Check in a visitor who has not checked in yet.
Expected: The visitor will not be checked in. An error message with maximum capacity reached will be shown.
- Prerequisite: Check if maximum capacity is reached. The number of people left to maximum capacity can be
obtained using
Check out a visitor
- Check out a visitor who is checked in
- Prerequisites: Ensure a particular visitor with known ID is checked in using
find i/123A(where 123A is the ID of the visitor). -
Test case:
checkout i/123A(where the visitor with ID 123A is checked in)Expected: Successfully checks out the visitor corresponding to the given ID. Current capacity is also shown.
- Prerequisites: Ensure a particular visitor with known ID is checked in using
- Check out a visitor who is already checked out
- Prerequisites: Ensure a particular visitor with known ID is already checked out using
find i/123B(where 123B is the ID of the visitor). -
Test case:
checkout i/123B(where the visitor with ID 123B is already checked out)Expected: A message with the visitor corresponding to the given ID has already checked out will be shown.
- Prerequisites: Ensure a particular visitor with known ID is already checked out using
- Check out a visitor who is not registered
- Prerequisites: Ensure that the visitor you are trying to check out is not in the
LogFile.txtfile by checking the ID. -
Test case:
checkout i/123C(where a visitor with ID 123C is not found in theLogFile.txtfile)Expected: An error message with no such person found will be shown.
- Prerequisites: Ensure that the visitor you are trying to check out is not in the
Clearing all visitor
Note:
- Clear refers to removing all the visitors in the
TrackingList.
- The data in the
TrackingList.txtfile will also be cleared.- The data in the
History.txtandLogFile.txtfiles will be not be cleared.
- Clearing all the visitors if any
-
Test case:
clearExpected: A message indicating the number of visitors cleared will be shown.
-
Editing maximum capacity
Note:
- Valid capacity value means that the capacity must be a positive number that is less than 7 digits.
- Invalid capacity value means that the capacity is either a negative number, or a positive number that is more than 6 digits.
- Editing maximum capacity with a valid capacity value
- Prerequisites: The current capacity must be known first. The current capacity can be obtained whenever a
visitor is successfully checked in or out. The current capacity can also be calculated by using the number of visitors
left to reach maximum capacity with the
listcheckedincommand. -
Test case:
editmax X(where X is more than or equal to the current capacity)Expected: A success message with the new maximum capacity of X will be shown.
-
Test case:
editmax Y(where Y is less than the current capacity)Expected: Maximum capacity is not updated. A message with the error details and the current capacity will be shown.
- Prerequisites: The current capacity must be known first. The current capacity can be obtained whenever a
visitor is successfully checked in or out. The current capacity can also be calculated by using the number of visitors
left to reach maximum capacity with the
- Editing maximum capacity with an invalid capacity value
- Prerequisites: Similar to the previous prerequisites.
-
Test case:
editmax N(where N is a negative number)Expected: Maximum capacity is not updated. Error details will be shown in the message.
-
Test case:
editmax P(where P is a positive number that is more than 6 digits)Expected: Similar to previous.
Finding a visitor
Note:
- A valid visitor means that the person can be found in the
TrackingList.- An invalid visitor means that the person cannot be found in the
TrackingList.
- It could be because the person got removed when the
TrackingListwas cleared or the person is not registered in thePersonLog.
- Finding a valid visitor
- Prerequisites: Ensure that the person you are trying to find is in the
TrackingList. -
Test case:
find i/123A(where 123A is the ID of the valid visitor to be found)Expected: The details of the visitor found including the checked in status.
- Prerequisites: Ensure that the person you are trying to find is in the
- Finding an invalid visitor
- Prerequisites: Ensure that the person you are trying to find is not in the
TrackingListor in thePersonLog. -
Test case:
find i/123B(where 123B is the ID of a visitor not in theTrackingList)Expected: A person not found message will be shown.
-
Test case:
find i/123C(where 123C is the ID of a visitor not in thePersonLog)Expected: Similar to previous.
- Prerequisites: Ensure that the person you are trying to find is not in the
Help
- Getting help from CYC
-
Test case:
helpExpected: A summary of the commands available to use for CYC will be displayed. A link to the User Guide will also be shown.
-
Listing checked in visitors
- Listing visitors who are currently checked in
-
Test case:
listcheckedinExpected: A table with the particulars of all the visitors currently checked in will be displayed. Number of people left to reach maximum capacity will also be provided.
-
Listing all visitors
Note:
listallcommand shows a list of all the visitors currently in theTrackingList.
- It does not show you the list of all the visitors registered in the
PersonLog.
- Listing all the visitors
-
Test case:
listallExpected: A table with the particulars of all the visitors currently in the
TrackingListwith their checked in status will be displayed.
-
Moving storage location
- Changing to a new storage location for
TrackingList- Prerequisites: Ensure that the new storage location is unused.
-
Test case:
movestorage X(where X is a valid path to the new storage location)Expected: A success message is shown with the new storage location path.
- Changing the storage location to the default location without CYC running
- Prerequisites: Ensure that you have changed to a new storage location and have exited CYC.
- Delete the
settings.propertiesfile found in the folder whereCYC.jaris located. - Launch CYC and checkin a visitor successfully.
- Exit CYC.
-
Open
TrackingList.txtfile that is located in the same folder as theCYC.jar.Expected: The visitor that was checked in successfully can be found in the
TrackingList.txtfile.
Exiting CYC
- Exit
-
Test case:
exitExpected: A exit message will be shown.
-